最近美术提出项目中的画面饱和度不够,于是在摄像机上添加了ColorCorrectionCurves效果,该效果是Unity标准资源中自带的,这里只是简要说明一下它的实现方式。本次使用只是单纯提升画面饱和度,因此并没有用到其中的高级选项。在高级选项中,我们可以调整不同深度的色彩饱和度,以打到模拟大气散射导致的远处物体饱和度下降的效果。下面只分析简化版部分,其他部分大同小异:
首先,脚本导出了几个参数:
|
1 2 3 4 |
public AnimationCurve redChannel = new AnimationCurve(new Keyframe(0f,0f), new Keyframe(1f,1f)); public AnimationCurve greenChannel = new AnimationCurve(new Keyframe(0f,0f), new Keyframe(1f,1f)); public AnimationCurve blueChannel = new AnimationCurve(new Keyframe(0f,0f), new Keyframe(1f,1f)); public float saturation = 1.0f; |
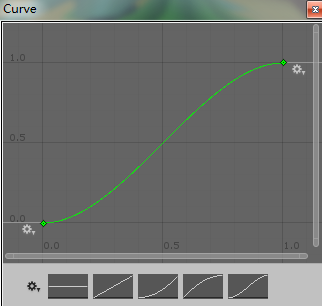
三条曲线控制器,分别代表RGB每个颜色通道下,控制饱和度的输入输出函数。横坐标代表原颜色值,纵坐标表示校正后的颜色值。如下图所示的曲线代表低色值部分会变得更低,而高色值部分会变的更高。从而拉大颜色差距,提升饱和度。saturation 是用来直接调节饱和度的系数。1.0表示饱和度不变。
接下来,在每次游戏画面渲染完成后,通过改写MonoBehaviour中
void OnRenderImage (RenderTexture source, RenderTexture destination)
接口处理渲染后的画面。
脚本中的处理代码如下:
|
1 2 3 4 5 6 7 8 9 10 11 12 13 14 15 |
rgbChannelTex = new Texture2D (256, 4, TextureFormat.ARGB32, false, true); for (float i = 0.0f; i <= 1.0f; i += 1.0f / 255.0f) { float rCh = Mathf.Clamp (redChannel.Evaluate(i), 0.0f, 1.0f); float gCh = Mathf.Clamp (greenChannel.Evaluate(i), 0.0f, 1.0f); float bCh = Mathf.Clamp (blueChannel.Evaluate(i), 0.0f, 1.0f); rgbChannelTex.SetPixel ((int) Mathf.Floor(i*255.0f), 0, new Color(rCh,rCh,rCh) ); rgbChannelTex.SetPixel ((int) Mathf.Floor(i*255.0f), 1, new Color(gCh,gCh,gCh) ); rgbChannelTex.SetPixel ((int) Mathf.Floor(i*255.0f), 2, new Color(bCh,bCh,bCh) ); } rgbChannelTex.Apply (); |
这段代码是将三段曲线分别进行255次均匀采样,生成如下图所示的一张灰度图(使用到的像素):
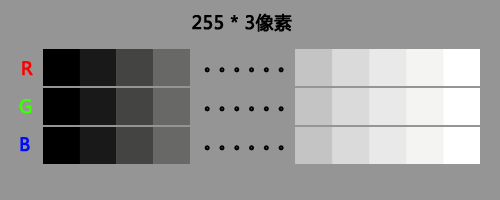
第一行的每一个像素的亮度(rgb中的任意一个值),都对应红色曲线对应的y坐标。第二行绿色曲线,第三行蓝色曲线。这张贴图就代表了上面的那三条曲线。下面的代码把这张贴图和饱和度参数传入到Shader中:
|
1 2 3 4 |
ccMaterial.SetTexture ("_RgbTex", rgbChannelTex); ccMaterial.SetFloat ("_Saturation", saturation); Graphics.Blit (source, destination, ccMaterial); |
下面来看在Shader中是怎么用的,在FragmentShader中:
|
1 2 3 4 5 6 7 8 9 10 11 12 13 14 15 16 17 18 19 20 |
fixed4 frag(v2f i) : SV_Target { 首先拿到处理之前像素颜色。 fixed4 color = tex2D(_MainTex, i.uv); 然后从曲线贴图中,分别取出对应的RGB值。 fixed3 red = tex2D(_RgbTex, half2(color.r, 0.5/4.0)).rgb * fixed3(1,0,0); fixed3 green = tex2D(_RgbTex, half2(color.g, 1.5/4.0)).rgb * fixed3(0,1,0); fixed3 blue = tex2D(_RgbTex, half2(color.b, 2.5/4.0)).rgb * fixed3(0,0,1); //把RGB值合并到一个颜色中,作为曲线校正后的颜色。 color = fixed4(red+green+blue, color.a); //计算校正后颜色的灰度 fixed lum = Luminance(color.rgb); //最后使用饱和度系数,差值计算最后的颜色值。 color.rgb = lerp(fixed3(lum,lum,lum), color.rgb, _Saturation); return color; } |
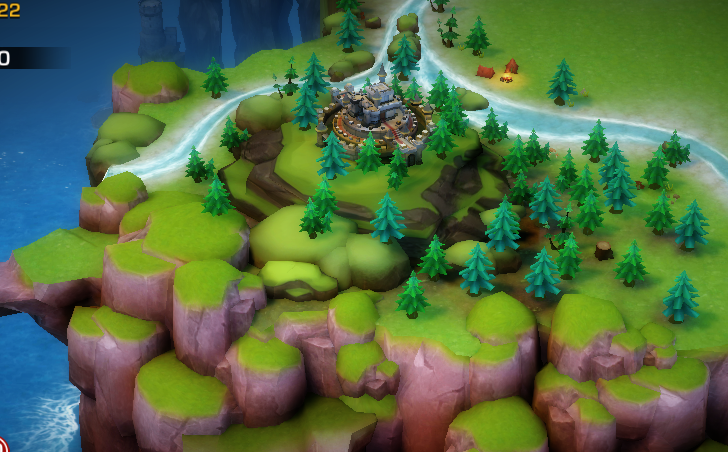
校正效果如下,
校正前:
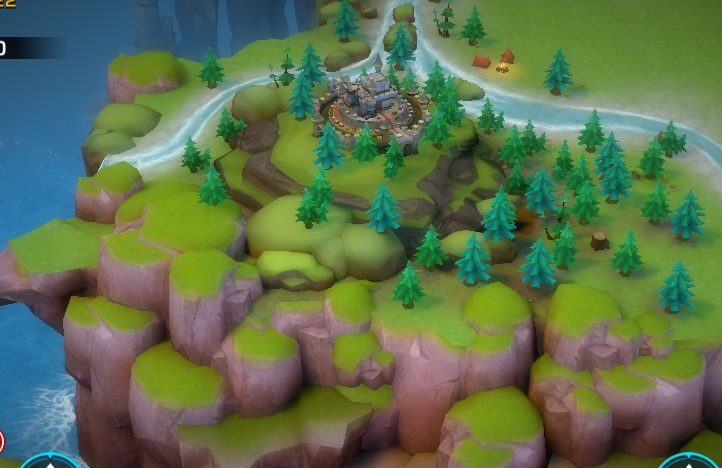
校正后: